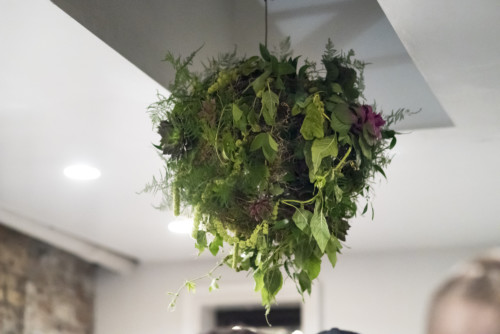
Ask Ella: How To Make A “Botanical Chandelier”
Ask Ella is a recurring Garden Collage feature where we ask our in-house florist, Ella Stavonsky, about floral design– including the history of, origin, and maintenance that goes into some of the most intriguing flowers on the market today. This column is dedicated exclusively to common and rare varieties of flowers you’re likely to find at your local market. This week, we spotlight “botanical chandeliers” and how to make them, for a slightly gothic take on early Spring.
If you’re trying to create atmosphere in a space that’s a little cold and bare, instead of crowding surfaces with flowers, try looking up.
In addition to being a more dynamic, unexpected natural decor choice than traditional bouquets, hanging installations automatically add a certain element of splendor and luxe– without breaking the bank.
To make these “botanical chandeliers,” start with a [easyazon_link identifier=”B00KHAVDB8″ locale=”US” tag=”gardcoll03-20″]grapevine ball[/easyazon_link] and pick your base. When Ella styled our chandeliers for The Botany Salon, she began with a dark green moss and worked out a palette from there, eventually settling on a slightly gothic, earthy combination of amaranths, plumosa fern, succulents, passion ivy, and love lies bleeding. The chandeliers are easily customizable with whatever is in season– just make sure you settle on a good variety of vines (which you can wrap around) and sturdy focal points (to pull everything together). Not sure where to start? Succulents and love lies bleeding are both reliable elements to begin planning with, and fit in well with just about any season’s colors. In general, make sure you’re selecting elements that can last outside of water (these also tend to be cheaper!)– so as tempting as jasmine and passion flower vines are, know that they’ll start to dry and curl up within a few hours.
Once you’ve got your botanical elements lined up, add your base (like moss) to the balls using [easyazon_link identifier=”B001K7QAYM” locale=”US” tag=”gardcoll03-20″]floral wire[/easyazon_link]. (Try to use floral wire along the inside of the ball, creating backings for your base. But however you can get the floral wire to work, go for it. You can always cover it up with other moss or plants later.) When applying the moss, don’t make it too even– it should feel organic. That is what’s in style after all!
As with bouquets, you’ll want to pick an odd number of focal points, evenly spaced around the sphere. Also be sure to take a moment to decide what will be the “top” and the “bottom” when you hang them. While the notion of a sphere can be overwhelming and a little bizarre to consider, just think of it in the same way you think of arranging a bouquet– since, in a way, bouquets can be very spherical. When you’ve selected focal points, begin by affixing the larger elements (like the succulents) using floral wire. This will help create anchors as you build. Be sure to constantly turn the ball as you add elements on, considering how it will look from different angles. Once you have all your larger elements arranged, work in the vines and other, more delicate details. Doing it in this order also helps disguise the any wire from the base and focal points. To mount, thread floral wire through whatever you’ve determined to be the top, and hang from a well secured hook.
With the proper plants, the installations can last for a few days; just be sure to mist them thoroughly two or three times a day, so that they are soaked through. Then, sit back, relax, and gaze.


